Tips for documenting your work Part 3 : Composition

Back to UAL Photography
TIPS FOR PHOTO DOCUMENTING YOUR WORK PART 3 : COMPOSITION
See part 1 - Tips for documenting your work : Introduction
See part 2 - Tips for documenting your work : Lighting
See part 3 - Tips for documenting your work : Composition
Composition
Fill the frame! Your piece should take centre stage in the photograph, make sure it fills your viewfinder nicely with a clean blank background bordering your piece. Large amounts of background should be eliminated. Watch out you don't have bits of the room in the background, you shouldn't be able to see corners of tables, doorways, carpets, kitchen sinks, unless they are a part of your piece!
Photographing 3D work
If work is 3D or an installation, shoot mulitiple still shots of each work, from different sightlines throughout the installation or display. Always have more shots than you need, you can edit later. With each piece you photograph, you should have an overall descriptive shot showing the whole piece and a selection of close up shots showing detail and texture where appropriate. Be careful with when shooting reflective pieces such as glazed ceramics, glass and perspex, not to photograph your reflection within the object - see the lighting section to see how to avoid this.
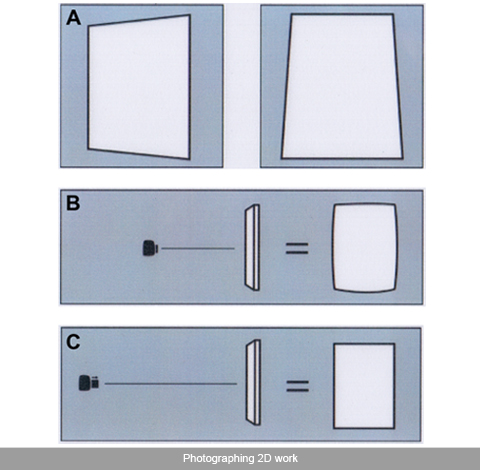
Photographing 2D work
If the work is A3 or smaller use a scanner. For bigger 2D works, hang the piece on a clean wall, centre the piece in the shot, lining up the sides of the paper or stretcher with the sides of the frame in the viewfinder. Frame the work by leaving a border around the piece.
See Slide 1:
A. 2D work can be easily distorted by not having the camera level with the centre of the piece.
B. If the camera is too close to the piece you might get an image that looks like it is bulging out from the middle
C. The best way to photograph 2D work:
1) hang the piece straight on the wall
2) using a tripod level the camera with the centre of the piece
3) have some distance between the camera and the piece and use zoom
4) fill the viewfinder of the camera as much as possible
5) check to see that the edges of your work are parallel with the edges of the viewfinder.
General
Photoshop is a great tool and can do wonders if used correctly and professionally. However it is best to take as best a photo you can in the beginning to ensure good results and will save you time. If you need to explain to the viewer what is happening in an image of your work it is likely to be bad documentation. Always have clear-cut self-explanatory shots of work; you will not always be present to explain work to its viewers. Take pride in your work, photograph it well. Good luck.
| Attachment | Size |
|---|---|
| Photo_Documentation.pdf | 8.96 MB |

This collection, Tips for documenting your work Part 3 : Composition, by A Pearson is licensed under a Creative Commons Attribution-NonCommercial-ShareAlike 3.0 Unported license.