Tips for documenting your work Part 2 : Lighting

Back to UAL Photography
TIPS FOR PHOTO DOCUMENTING YOUR WORK PART 3 : LIGHTING
See part 1 - Tips for documenting your work : Introduction
See part 2 - Tips for documenting your work : Lighting
See part 3 - Tips for documenting your work : Composition
Lighting
If possible try to use one type of light only, either all natural, or all artificial. This makes it easier for the camera's white balance to achieve consistent colour tones. Natural light is the very best for accurate colour in images of paintings and soft shadows in object shots.
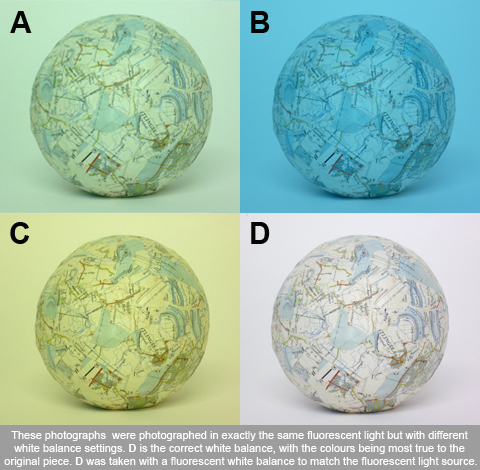
White balance (WB) is the process of removing unrealistic color casts, so that objects which appear white in person are rendered white in your photo. Your camera's white balance will take into account the "color temperature" of a light source, which refers to the relative warmth or coolness of white light. An incorrect WB can create overly blue, orange, or even green images, which are untrue to your piece. Auto white balance often might create a colour cast so you might need to change it accordingly. See Slide 1
Flash
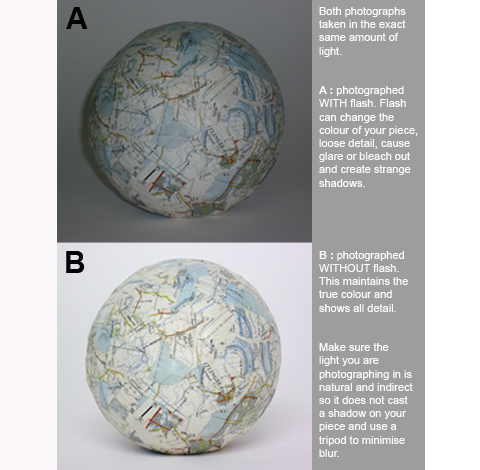
Try to avoid using flash, it often causes odd looking shadows, glare when photographing perspex or glass objects and can change the colours of your piece. Generally, turn the flash off and either use natural light or separate lights. You should generally aim for an evenly lit piece. See Slide 2
Consider how the artwork needs to be represented. If shadows are integral to the piece use one directional light. if you want shadows to be eliminated you need to use a minimum of two lights and shift them around until the shadows are lightened. Pieces with glass or reflective surfaces are difficult to shoot with studio lights. Best to photograph them in natural light and try to position the camera so that it is slighly angled downwards, upwards or towards the side of the piece to eliminate your reflection in the piece. Generally lights on the side of the piece will bring out texture, frontal lights will flatten the image. If you choose to use lights always, take a few photos of your piece in natural light too to have an original record of the piece.

This still image, Tips for documenting your work Part 2 : Lighting, by Ashleigh Pearson is licensed under a Creative Commons Attribution-NonCommercial-ShareAlike 3.0 Unported license.


Comments
Brilliant white balance image example Ash !